This guide takes you from a new retentix account to your first working cancel flow. You do not need to write any code — the only thing you change is where your app's “Cancel subscription” link points.
Seven steps take you live. Steps 8 and 9 are optional, and only worth doing if you want an accepted offer applied in Stripe for you rather than landing in your inbox. The short sections after them cover what the panel does once you are running: reading the results, notifications and webhooks, the badge, exporting, and your own plan.
1
Create an account
Where:app.retentix.co
What to do: Sign up with your email address and a password.
What happens: The screen says “Check your email to confirm your account, then sign in.” Follow the link in that email to confirm the account, then sign in.
2
Choose a plan
Where: You land on the plan screen automatically when you sign in.
What to do: Pick the plan that fits. Checkout opens inside the same page rather than sending you off to another site.
What happens: When payment completes the screen waits for a moment while we confirm your plan has opened. Once it has, you are in the panel.
This step cannot be skipped. With no plan, no screen in the panel opens: whatever address you go to, you come back here. That is deliberate, not a fault.
The differences that matter while you are setting up:
Starter
Pro
Agency
Products
1
5
15
Reasons
5
5
7
Subscriber verification
Yes
Yes
Yes
Automatic fulfilment
Yes
Yes
Yes
Webhook notifications
—
Yes
Yes
CSV export
—
Yes
Yes
Hide the “Powered by” badge
—
Yes
Yes
Count your products before you choose. A product is one website or application of yours, and each gets its own cancel flow. At the limit, + New product is disabled — so on Starter you would find out at step 3. You can change plan later; it is just less pleasant than counting now.
3
Add your product
Where:Products → + New product
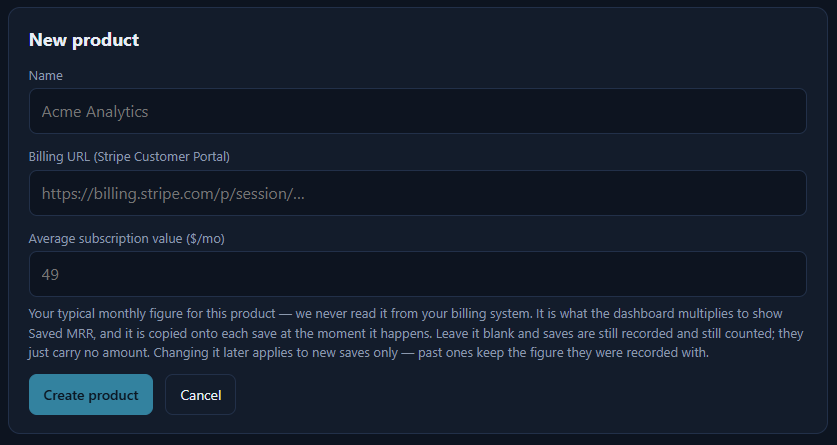
The three fields a product is made of. The third one is optional.
What to write:
Field
Required
What goes in it
Name
Yes
The name of your product, e.g. Acme Analytics
Billing URL (customer portal)
No
The next step. You can fill it in here or come back to it.
Average subscription value ($/mo)
No
Your typical monthly subscription value for this product, e.g. 49
Press Create product.
What happens: pressing that button creates the product and writes a working flow at the same moment — five reasons, three offers, and the five mappings between them. Your flow address works from that second; there is nothing else for you to save.
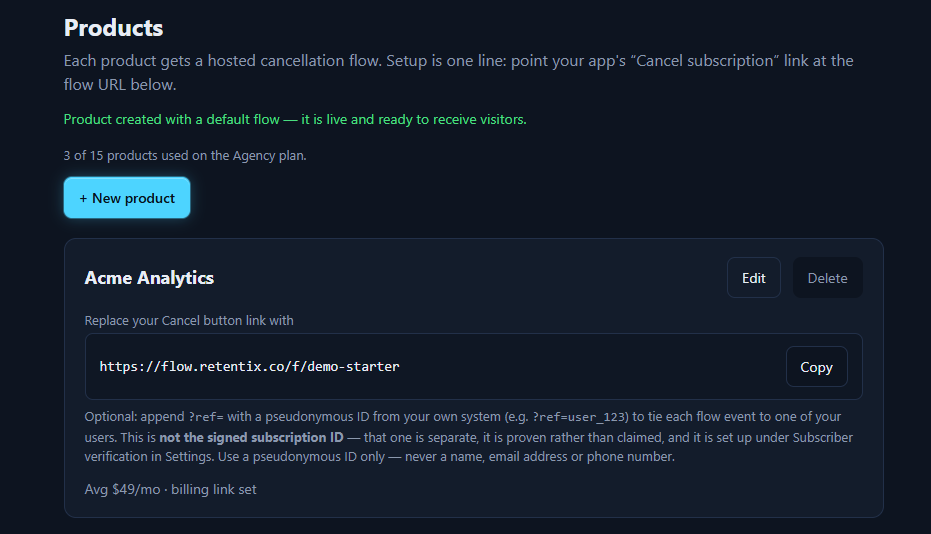
After Create product: the flow exists and the address is ready to copy.
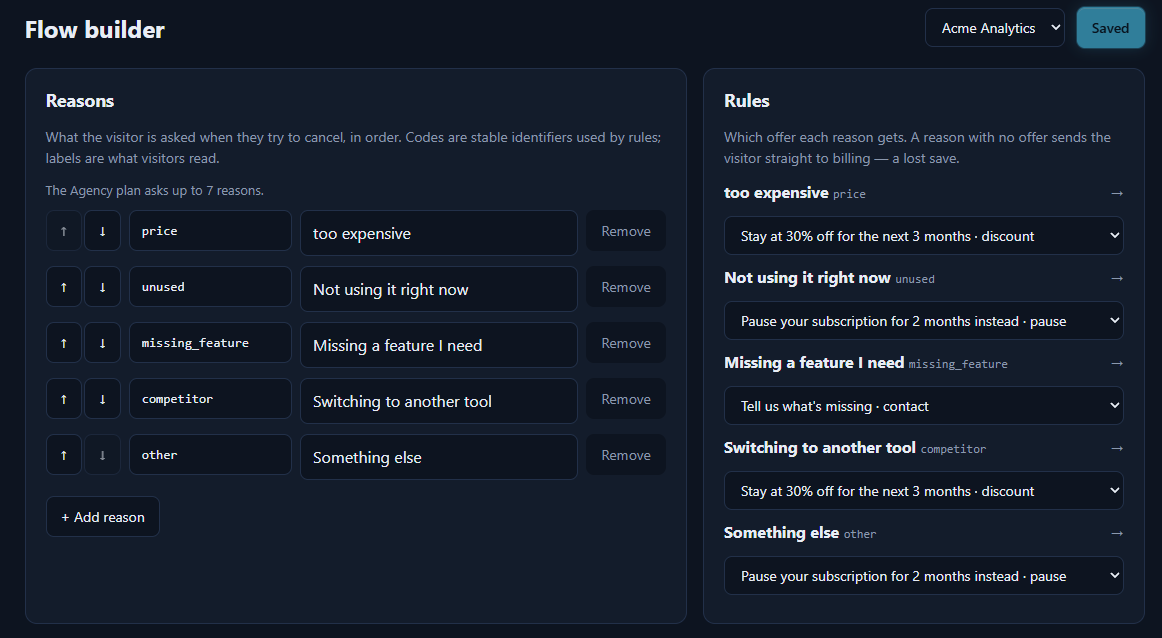
The flow you get by default:
If the visitor picks this
They are shown
Too expensive
30% off for 3 months
Not using it right now
A 2 month pause
Missing a feature I need
A “talk to us” form
Switching to another tool
30% off for 3 months
Something else
A 2 month pause
This is why step 5, the flow builder, is optional: you have a working setup without editing anything.
About Average subscription value
This field is where the money figures in the panel come from, and it is independent of Stripe — it works the same whether or not you have a key connected. The panel's own description of it:
Your typical monthly figure for this product — we never read it from your billing system. It is what the dashboard multiplies to show Saved MRR, and it is copied onto each save at the moment it happens. Leave it blank and saves are still recorded and still counted; they just carry no amount. Changing it later applies to new saves only — past ones keep the figure they were recorded with.
So: if you are not sure, leave it blank. An invented figure is worse than no figure.
4
Billing URL
What this field is for: it is the last link in the flow. When a visitor turns your offer down, this is where they are sent — the customer portal your billing provider hosts, where they can finish what they came to do.
What to do: paste your customer portal address into Billing URL and save. The field is on the New product form, so you can fill it in while creating the product; if you skipped it there, it is under Products → Edit.
The address has to start with http:// or https://; no other form is accepted.
Your provider has two portal addresses. Only one of them belongs here.
This is the part that costs people an afternoon, so it is worth thirty seconds now. Every provider we have looked at publishes two different things that both look like “the customer portal”:
Kind
What it is
Goes in this field?
Per-subscriber
A temporary link, minted one at a time through the provider's API with your secret key. It belongs to one subscriber and it expires.
No. You cannot paste it in — there is no single value to paste.
Account-level
One static address for your whole account or store, published by the provider expressly so you can hand it out.
Yes. This is the one.
If the address you found has a long random tail and the provider's own documentation calls it a session, it is the first kind. Go back and look for the one the provider describes as shareable.
Where the account-level address lives, by provider
Provider
Shape
Where in their dashboard
Stripe
https://billing.stripe.com/p/login/…
Settings → Billing → Customer portal, then Ways to get started → Activate link
Paddle
https://customer-portal.paddle.com/cpl_…
Business Account → Customer Portal
LemonSqueezy
https://<your-store>.lemonsqueezy.com/billing
Design → Portal
On LemonSqueezy there is no copy button. The address is only rendered in the preview bar on that screen, so you build it yourself from your own store subdomain — the store name you already use, followed by .lemonsqueezy.com/billing.
All three then work the same way, and it is worth knowing what your subscriber will see: they open the address, they type their email, the provider emails them a sign-in link, and they cancel inside the portal. They do not get in with a password and you do not have to give them one.
Before you paste it in, three things that fail quietly
Stripe. The login link does not exist until you press Activate link — the page is there before you do, and the address is not. Your subscriber's email address also has to be on file in Stripe, or the sign-in mail is never sent at all; nothing errors, it simply does not arrive. And live mode and test mode keep separate configuration, so a link you activated while testing will not work for a real subscriber.
Stripe, one more. The portal has its own retention coupons feature. It is off by default, and if you switch it on your subscriber meets Stripe's own retention offer immediately after declining yours — two offers in one cancellation, from two systems that do not know about each other. We suggest leaving it off.
Paddle. The portal heading and the emails it sends carry your account's legal name, not your product's. The field that changes it is Company Display Name, and it is not editable from the dashboard — Paddle's own note on that field says to email sellers@paddle.com. Worth doing before you send subscribers there, unless your legal name is your brand.
LemonSqueezy. Two separate switches: Enable customer portal opens the portal, and Cancel subscriptions decides whether cancelling is offered inside it. With the first on and the second off, the portal opens and there is nothing in it to cancel with.
Check that cancelling is actually switched on. At all three providers, whether a subscriber can cancel from the portal is a setting you control — and it can be off. If you send someone here and it is off, they arrive at a page that cannot do the one thing they came for. Open your own portal address once, as a subscriber would, and look.
Three of the claims on this page are not ours to make first-hand. What we have not measured says which, and why.
If you do not have it yet you can leave the field blank and carry on — setup does not stop here. The flow still works in full: the reason is asked, the offer is shown, an acceptance is recorded, and you are notified. Only the last step changes. When the visitor goes through with cancelling they see a neutral page instead of a redirect:
We couldn't open the billing page — Please head back to the app you're subscribed to and manage your subscription from there.
So the visitor has to find their own way back to your app to finish cancelling. Nothing that was recorded is lost, but this is setup left unfinished, not a route to prefer. Fill the field in as soon as you have the link.
5
Edit the flow
The default flow already works. This step is for changing it to suit your product.
Where:Flow builder
There are three cards on the screen, and they are filled in this order.
The flow builder: reasons on the left, the offer each one gets on the right.
Reasons — what the visitor is asked
Each row has two fields: a code and a label.
The code is the fixed identifier your rules use. It can only contain lowercase letters, digits and underscores (price, missing_feature), cannot repeat, and cannot be empty.
The label is the text your visitor reads, and it cannot be empty.
The ↑ ↓ buttons change the order, and order matters: if your plan asks five reasons, the first five in the list are the ones asked. The rest are shown dimmed and are not asked.
Offers — what you put up to keep them
You pick a Type first, and the fields for that type appear:
Type
Fields
Rule
discount
Percent off · Duration (months)
The percentage must be above 0 and at most 100 — decimals are allowed (12.5 is valid). The duration must be a whole number, at least 1.
pause
Pause length (months)
A whole number, at least 1.
downgrade
Target plan · Stripe price ID
Target plan is required — the panel refuses to save without it. The price ID is optional; the two are explained below.
contact
—
Headline and body text only
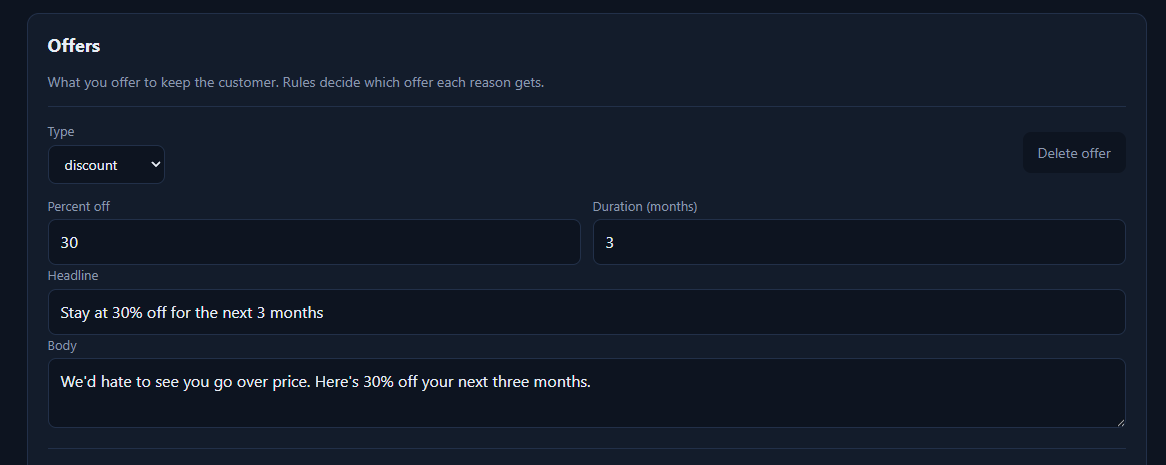
A discount offer: the percentage and duration, and the two lines the visitor reads.
Every offer also carries a Headline and a Body — that is what the visitor reads.
Why the month fields refuse decimals. Both refuse a fraction, for two different reasons, and only one of them is dangerous:
Pause length is the dangerous one. A pause of 1.5 months is cut to 1 when the resume date is worked out, and nothing anywhere reports it. You would have promised your customer two months and given them one. The field refuses it up front because nothing downstream ever will.
Discount duration is the loud one. It reaches Stripe as a whole number of months, so a fraction comes back as an error rather than as silence. The field still refuses it — you would just have found out either way.
A flow can hold at most 15 offers. That limit is the same on every plan.
The downgrade offer has two fields, and only one of them is required
They sit side by side on the same row and they are written for different readers, which is why one of them stops a save and the other does not.
Field
Required
Who reads it
Target plan
Yes
Your visitor. It is the plan they are told they are moving to, so write it the way you would say it — Basic, not an internal code.
Stripe price ID
No
Nobody, on any screen. It is the machine half: the price retentix moves the subscription onto once you have connected a Stripe key at step 9.
A blank target plan does not save. The builder refuses it, and it is right to — an offer that says “move to a smaller plan” without naming the plan is not something your visitor, or Stripe, can act on.
A blank price ID saves perfectly well and changes exactly one thing: you make the plan change in Stripe yourself, from the email, as you do for every offer before a key is connected. Fill it in and step 9 makes the change for you.
Where to find it: open the product in Stripe, go to its Pricing section, and copy the ID of the price you are moving people onto. It begins with price_. The ID beginning prod_ is the product rather than the price and is the easy mistake here — the builder catches that one and will not let you save it.
Nothing can check that the price you pasted is the right one. The shape is checked; whether it belongs to your account, or costs less than what they are on, is not knowable from here — that answer comes from Stripe, and you read it in the recoveries feed.
Rules — which reason sees which offer
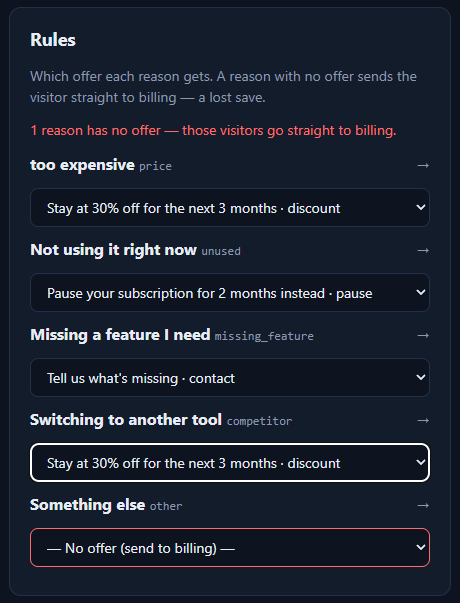
Each reason has a dropdown next to it. Leave it at — No offer (send to billing) — and a visitor who picks that reason goes straight to billing. On your cancel exit that is a save you never had a chance at, and the panel flags it. On a delete-account exit it is the point — see Two exits, two products.
A reason left without an offer is called out here rather than failing quietly.
Which offer appears for which reason is your configuration, not our judgement. We do not decide that a price-sensitive customer should see a discount; you do, and the page shows what you set.
What happens: nothing goes live until you press Save changes at the top right. If you have unsaved changes the screen tells you so.
If your text contradicts your settings — a headline saying “50% off” over an offer set to 30% — you get a warning when you save, asking whether to go ahead. It is a reminder, not a block.
6
Point your cancel button
Where:Products, in the “Replace your Cancel button link with” box on the product card.
What to do: copy the address there. It looks like this:
https://flow.retentix.co/f/<your-code>
The address box on the product card, with the optional ?ref= note under it.
Change the destination of your app's “Cancel subscription” link to that address. Your flow is live from the moment you do.
What happens: your visitor now arrives at your cancel flow instead of going straight to Stripe.
Renaming the product does not change this address. It is generated once and stays fixed, because by then you may have pasted it into your own application.
You can add an identifier from your own system to the end of the address:
https://flow.retentix.co/f/<code>?ref=user_123
The value is stored exactly as you sent it; it is not interpreted and not validated. Leading and trailing spaces are trimmed, and anything longer than 200 characters is cut.
Use a pseudonymous ID only — never a name, an email address or a phone number. This field is for a user number from your own system.
This is not the same thing as the signed subscription ID in step 8. A ref is claimed; a signed ID is proven. What we keep of it is covered in What we keep, and for how long.
7
Test it
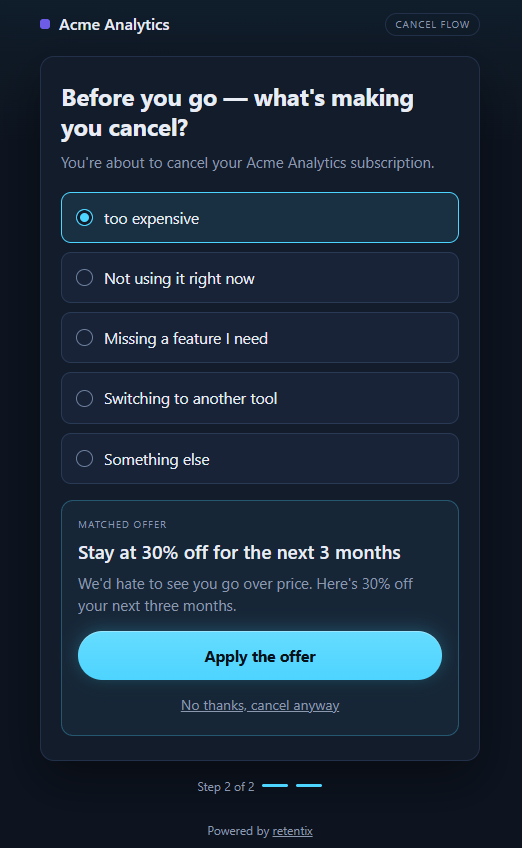
What to do: open your flow address in a browser. Pick a reason, and accept the offer you are shown.
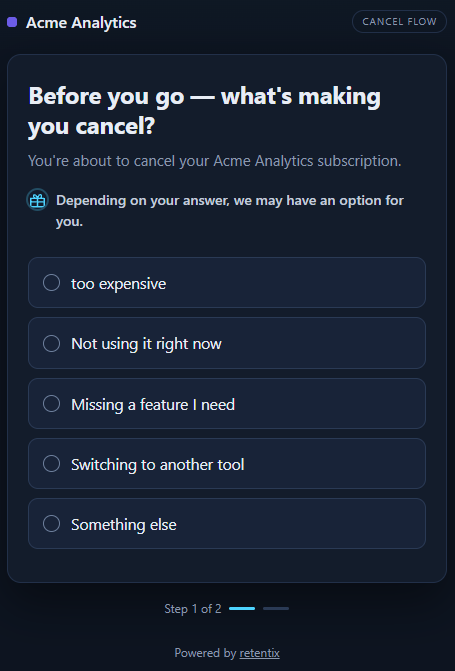
What your visitor sees first, in place of your customer portal.After a reason is chosen, the offer your rule matched to it.
What happens:
What the visitor sees: after accepting, they are sent on to your customer portal — the address you filled in at step 4. If you left that field blank they get the neutral page described there instead, and the flow ends where it stands.
You get an email saying which user accepted which offer. That notification is on by default; you can turn it off under Settings → Notifications.
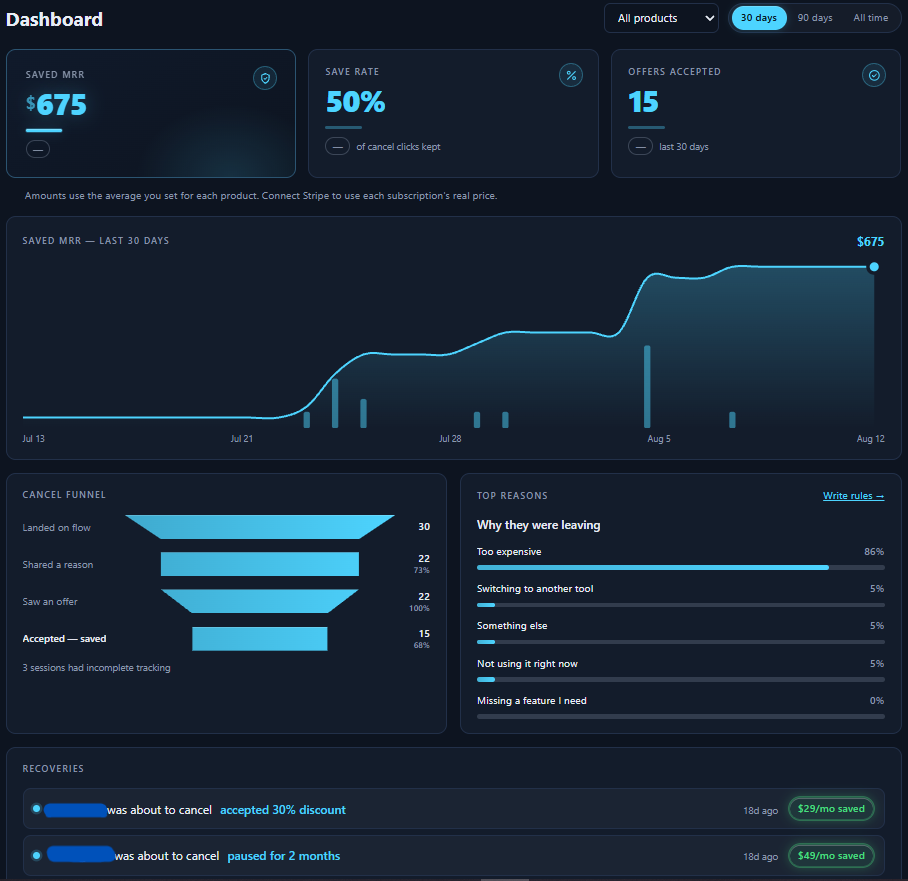
The save appears on your dashboard.
The dashboard once saves start arriving, with the recoveries listed underneath.
A visit produces at most five events, in this order: the page opened, a reason was chosen, an offer was shown, the offer was accepted, and the visitor was sent on to your customer portal. A visit that ends early simply stops writing events; nothing is filled in afterwards. What is kept, and for how long, is in What we keep, and for how long.
This is a real visit. Your own test is recorded as a real event and counts towards your dashboard figures. There is no separate preview or test mode in the panel, and we have not found a way to filter test events out afterwards.
That is setup. Everything below this point is optional: steps 8 and 9 hand the fulfilment work to retentix, and the sections after them are about running what you have just built.
Automatic fulfilment (optional, two steps)
With the setup above, you apply an accepted offer in Stripe: the email arrives, you open it, you apply it. That is how the product works by default and there is nothing missing about it.
The two steps below hand that job to retentix instead. They have to be done in order: signature first, key second. The key does not work on its own without the signature.
8
Signing key
Where:Settings → Subscriber verification
What to do: press Generate signing key. If a key is already active that button is not there — the screen says a key is active and offers Rotate key instead, which is covered at the end of this step.
What happens: a 64-character key appears on screen. It is shown once and never shown again. We do not store it in a form the panel can read. If you lose it there is no way to get it back — you can only replace it with a new one.
From then on, when your backend builds the cancellation link, it signs this string:
<subscription id>.<unix seconds>
There is a ready-made example in the panel: the Show setup instructions section on that same screen gives you the signing code to copy. We do not reproduce it here, so that two versions of it cannot drift apart — the panel's copy is always the current one.
Even with the example in front of you, these three are what cost people an afternoon:
The key is used as text, all 64 characters of it. When you see a 64-character hex string you will want to turn it into bytes — Buffer.from(key, 'hex') or similar. Do not. If you do, you produce a signature that is technically flawless and will never verify, and the error message cannot tell you why. This is the most expensive mistake here.
The timestamp is in seconds, not milliseconds. Date.now() gives milliseconds — remember to divide by 1000.
It is the subscription ID, not the customer ID. One customer can hold more than one subscription, and an offer is applied to a subscription.
The signature is sent as lowercase hex and is accepted for 24 hours. Your existing ?ref= parameter is unchanged; this sits alongside it. The window, and what the check does and does not cover, are in Proving which subscriber is cancelling.
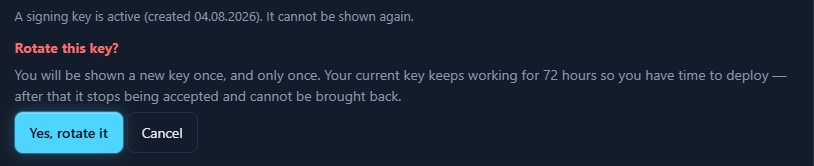
Replacing the key (Rotate key): Rotate key → Yes, rotate it. The new key is shown once. Your current key keeps working for 72 hours, so your integration does not break the moment you rotate and you have three days to deploy the new one. You cannot rotate again until those 72 hours are up.
The rotation confirmation, including how long the old key keeps working.
9
Connect Stripe — Stripe only
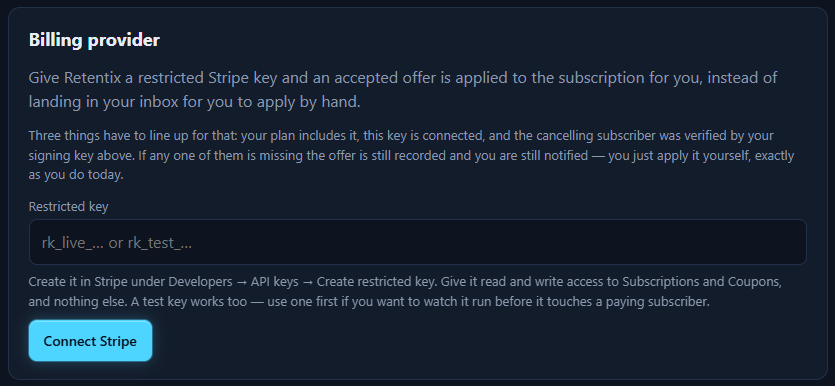
Where:Settings → Billing provider
The Billing provider screen, with the three conditions written above the field.
What to do: in your Stripe dashboard, follow Developers → API keys → Create restricted key. Give it these two permissions:
Permission
Access
Why
Subscriptions
Read and write
read the subscription and write the offer onto it
Coupons
Read and write
create the coupon an offer needs
And nothing else. Paste the key you get into the Restricted key field and press Connect Stripe.
The exact field names and click order on Stripe's own screen are not something we have measured; the path above is the one the panel itself gives.
What happens: the key is connected. retentix never shows it back to you — not in the panel, not in an error message. If you need it again you read it from Stripe. What we do with it, endpoint by endpoint, is in What we do with your Stripe key.
Once it is connected, an accepted offer puts two jobs in the queue at once: the notification to you, and the attempt to apply the offer in Stripe. Both are queued at the same moment and we do not promise an order between them — the email can arrive before the offer is applied, or after.
A key in the wrong shape is refused before anything is sent:
That does not look like a restricted key. It must start with rk_ and be at least 32 characters. Nothing has been sent.
Try a test key first. A key starting with rk_test_ is accepted too, and it lets you watch the whole thing run before it touches a paying subscriber.
Disconnecting: Disconnect key → Yes, disconnect it. Because we hold no second copy, reconnecting means generating a fresh key in Stripe. Until you do, accepted offers are still recorded and you are still emailed — they are just not applied for you.
The three conditions for automatic fulfilment
In the panel's own words, three things have to line up at the same time:
Your plan includes it
Your Stripe key is connected
The cancelling subscriber was verified by your signing key
If any one of them is missing the offer is still recorded and you are still notified — you just apply it yourself. That is not a failure.
Did it work? The recoveries feed
With steps 8 and 9 done, retentix tries to apply accepted offers in Stripe for you. It does not always succeed, and it never tries twice. The recoveries feed at the bottom of your dashboard is where you find out which happened: every accepted offer gets a line, and the line carries the outcome.
There are five. Two of them mean the work is finished; the other three mean it is yours.
What the line says
What it means
Applied in Stripe
Done. The discount, pause or plan change is on the subscription.
Already in place
Also done, and not a fault: what they accepted is what they already had.
Stripe refused
Stripe answered and said no. Nothing was changed.
apply by hand
The attempt never reached Stripe, or stopped before asking. Yours to apply.
Not included in your plan
The account had no active plan when the offer was accepted, so nothing was sent to Stripe. The save is recorded all the same.
The line also says which one it was. “apply by hand” covers a dozen different situations, so the reason is printed beside it as a sentence. The ones you are most likely to meet while setting up:
This visitor arrived without a signed subscription ID — step 8 is not signing that link yet.
No Stripe key is connected — step 9 is not done.
This downgrade offer has no Stripe price ID — the optional field back at step 5.
This subscription has more than one line item — retentix will not guess which one is the plan.
This subscription already carries a discount — it will not put a second one on top.
When the refusal came from Stripe rather than from us, Stripe's own code is printed next to the sentence. That is on purpose: our reasons are a closed list we can write out in full, Stripe's are not, and the code is the thing you paste into a support request or search for in your own Stripe dashboard.
Every outcome above is final for that acceptance. Nothing retries, and nothing changes its mind an hour later. A line that does not read “Applied in Stripe” or “Already in place” is a line to act on — and either way the save was recorded and you were emailed.
Reading the dashboard: Saved MRR
Saved MRR is the one number this product exists to move. It is a multiplication, not a measurement: the offers a visitor accepted, times the Average subscription value you entered when you added the product.
That has two consequences worth knowing before you quote the number to anyone. It does not know what any individual visitor actually pays — it uses the one figure you gave it. And it counts the save at the moment the offer is accepted, not months later when the money has actually arrived. A visitor who accepts an offer and then cancels next month still counts here.
So read it as what your flow caught, not as revenue in the bank. If you want the second number, your billing provider already has it.
Notifications: the email, and the webhook
Where:Settings → Notifications
The email
Email me when a recovery happens is on from the day you sign up and goes to the address you sign in with. On Starter it is the whole notification system, and it is what you read when an offer is yours to apply. Turning it off is a setting, not a plan.
The webhook — Pro and Agency
If you would rather your own system heard about a save than your inbox, put an address in Webhook URL (optional) on the same card. On Starter the field is drawn and locked rather than hidden, so you can see that it exists.
What retentix does with it, exactly:
It must start with https://. Anything else is refused when you save, before it is ever used.
One POST, content-type: application/json. The body is the record described below.
Five seconds, then it is abandoned. A slow endpoint and a dead one are recorded as different failures, but both are over at five seconds.
It is never retried. One attempt per acceptance. If your endpoint was down, that acceptance is not sent again — the email and the dashboard still have it.
Only an accepted offer fires it. The other four things a visit can produce do not. If you want those, that is the raw event log under Getting the numbers out.
What arrives
One JSON object, with these eleven fields and no others:
Field
What it holds
id
The event's own number.
product_id
Which of your products the visit belonged to.
session_id
The visit. Every event of one visit shares it.
event_name
Always offer_accepted, for the reason above.
reason_code
The code of the reason they picked, as you wrote it in the builder.
offer_type
discount, pause, downgrade or contact.
offer_params
That offer's own settings, as they stood at the moment it was accepted.
ref
The ?ref= you put on the link. A claim, never verified.
subscriber_id
The subscription ID — present only when step 8's signature checked out, which is what makes its presence proof.
mrr_value
The product's average subscription value, copied at the moment of the save.
created_at
When the acceptance happened.
The request is not signed, and you should know that before you build on it. The only header we send is content-type. There is no shared secret and no signature, so your endpoint has nothing to check: it cannot prove a POST came from retentix, and anyone who learns your address can send it the same shape. Treat what arrives as a reason to go and look, not as an instruction to act on. Today, keeping the address unguessable is the whole of the protection.
Dropping to Starter does not delete your address. It stays on your account and stops being sent to; move back up and it starts again on its own. That is the rule everywhere in the panel — a plan change never throws away something you configured.
The “Powered by retentix” badge
Where:Flow builder, below the cards — one checkbox reading Show “Powered by retentix” on the flow page. It is a setting rather than a card, which is why step 5 counts three cards and not four.
It is on for every account on every plan until someone turns it off. Pro and Agency can; on Starter the checkbox is drawn and locked, so the rule is visible rather than something you find out about later.
Leaving it on is worth something even where you may remove it: your own flow then looks exactly like the one your customers see.
Getting the numbers out
Where: the Export card on your dashboard. Included on Pro and Agency; on Starter the card says so and stays where it is. Nothing about your own figures is locked away — the dashboard reads the same rows either way.
An export is whatever you are looking at. It follows the period and the product filter already set on the screen above it, so set those first and the file follows.
Button
What you get
Download recoveries (CSV)
Your saves, matching the numbers above it. One row per accepted offer. Contact requests are left out, because they are feedback rather than a save.
One file per product
Agency only, and only once you have more than one product. The same rows split into a file per product, each opening with a summary header you can send to a client as it is.
Raw event log
Every event, not only the saves: what visitors were shown, what they chose, and where they left.
The first and the last are the pair worth keeping straight. Recoveries are the result; the event log is the path, and it is the one that answers where people drop off.
Two exits, two products
Some apps have two ways out. One is “Cancel subscription”, which only a paying subscriber reaches. The other is “Delete account”, which anyone can reach — including people who never paid.
An offer belongs on the first one. Showing a discount to someone who has no invoice is noise, and they know it. But the reason question is worth asking at both exits: knowing why people leave before they ever pay is worth as much as knowing why they stop paying.
To do this you set up a second product. Each product carries its own address and its own Billing URL, so the delete-account exit gets its own link and sends visitors on to your own delete page. In the flow for that product, leave every reason at — No offer (send to billing) — and tick “This flow is offer-free on purpose” at the bottom of the flow builder. The panel will stop telling you the flow is unfinished, because it isn't.
Reasons are still recorded. Every visitor who picks one is counted the same way as on your cancel exit; what changes is that nobody is offered anything.
This costs one product slot. Starter includes one product, so a second exit needs Pro or Agency. The reason survey itself is on every plan — it is the second exit that needs the extra slot.
Changing or cancelling your own plan
Where:Settings → Plan → Manage plan. The panel asks your billing provider at the moment you press it rather than keeping a copy, so the renewal date and payment method you are shown are the live ones.
Moving to another plan
Every plan you are not on gets a Move to … button, and pressing one shows you what it does before it does it: what is charged now, whether your next payment date moves, and what you would lose. Nothing is written until you confirm.
What a move down actually costs, since this is the part worth reading twice:
Products past the new ceiling stop showing offers and send their visitors straight to billing. Nothing is deleted — the products, flows and offers stay exactly as you wrote them.
Reasons past the new ceiling stop being asked, keeping their wording, their offers and their order, and they come back if you move up again.
Automatic fulfilment is on every paid plan, so moving between plans does not turn it off. What a move does change is set out in the plan comparison.
Cancelling
Cancel plan hands you to your billing provider's own page, because that is where the subscription lives and what it says there is the authority. Your cancel pages stop showing offers, every visitor goes straight to billing, and the protected MRR on your dashboard stops moving. Nothing is deleted here either.
If something specific is not working, tell us before you go — we would rather fix it.
What we have not measured
Everything else in this guide was read out of the panel's own source or walked on a live account. These four were not, and you are better off knowing which is which than finding out at the wrong moment.
Paddle's cancel control. We walked the whole path on a real Paddle account, but the subscription we tested with had already been cancelled — so we never saw the cancel control itself.
How long LemonSqueezy's sign-in link stays valid. We do not know. The twenty-four hours you may read elsewhere belongs to their API's per-subscriber link, which is the other kind of address entirely.
Stripe's own screens. We have no Stripe account, so every path through Stripe named in this guide — the portal setting, the restricted key, the price ID — is read from Stripe's documentation rather than walked. What the panel does with what you paste in is measured; what Stripe's dashboard looks like on the day you read this is not.
Whether the price ID you paste is the right one. Nothing here can tell you. Checking would need a permission the key we ask for deliberately does not carry — What we do with your Stripe key sets out the whole of what that key can reach.